MicroSoc
MicroSoC is a little SoC based on VexiiRiscv and a tilelink interconnect.
Its goals are :
To provide a simple reference design
To be a simple and light FPGA SoC
Target a high frequency of operation, but not a high IPC (by default)
Here is a architecture diagram :
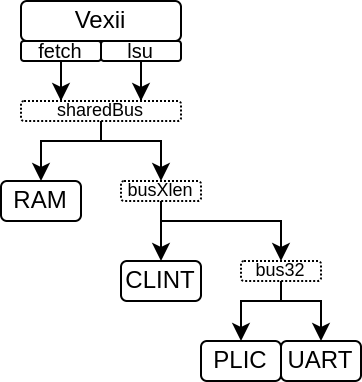
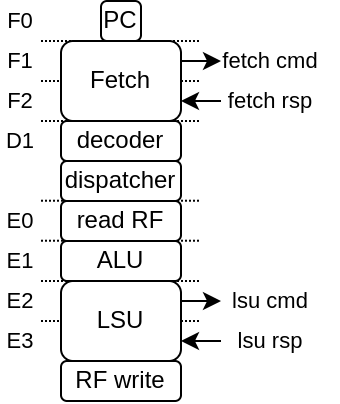
Here you can see the default vexiiriscv architecture for this SoC :
You can find its implementation here https://github.com/SpinalHDL/VexiiRiscv/blob/dev/src/main/scala/vexiiriscv/soc/micro
MicroSoc.scala : Contains the SoC toplevel
MicroSocGen.scala : Contains the scala main which can be used to generate the SoC verilog
MicroSocSim.scala : Contains a simple SpinalSim testbench for the SoC
The MicroSoC code is commented in a way which should help non-initiated to understand what is happening. (this is an invitation to read the code ^^)
Verilog generation
To generate the SoC verilog, you can run :
# Default configuration
sbt "runMain vexiiriscv.soc.micro.MicroSocGen"
# SoC with 32 KB + RV32IMC running at 50 MHz:
sbt "runMain vexiiriscv.soc.micro.MicroSocGen --ram-bytes=32768 --with-rvm --with-rvc --system-frequency=50000000"
# List all the parameters available
sbt "runMain vexiiriscv.soc.micro.MicroSocGen --help"
Simulation (SpinalSim / Verilator)
If you have Verilator installed, you can run a simulation by doing :
# Default configuration
sbt "runMain vexiiriscv.soc.micro.MicroSocSim"
# List all the parameters available
sbt "runMain vexiiriscv.soc.micro.MicroSocSim --help"
Here is a set of important command line arguments :
Command |
Description |
|---|---|
--load-elf ELF_FILE |
Will load elf file into the ram/rom/flash of the SoC |
--trace-fst |
A FST wave of all the DUT signals will be stored in simWorkspace/MicroSocSim/test (you can open it using GTKwave) |
--trace-konata |
A konata trace of all the executed instruction will be stored in simWorkspace/MicroSocSim/test (you can open it using https://github.com/shioyadan/Konata) |
Note that the default VexiiRiscv configuration is RV32I, with a relatively low area/performance. You can for instance get more performance by adding --allow-bypass-from=0 --with-rvm --with-btb --with-ras --with-gshare
While the simulation is running you can connect to it using openocd as if it was real hardware :
openocd -f src/main/tcl/openocd/vexiiriscv_sim.tcl
Compiling and running C/C++ with CMake
There is a template CMake project which can be used to write baremetal applications in C/C++ on the MicroSoc.
Here is how you use it to compile a simple UART example :
git clone https://github.com/SpinalHDL/VexiiFirmware.git
cd VexiiFirmware
export VEXII_FIRMWARE=$PWD
cmake -S . -B build -DSOC=microsoc/default -DDEVICE=microsoc_sim
make -C build example-uart
Here is a few explenation :
-DSOC=microsoc/default specifies that we use the microsoc default configuration (it rever to the soc/microsoc/default folder)
-DDEVICE=microsoc_sim specifies that the SoC is running in the simulation "device", which mostly specifies that the clock speed is quite slow. (it refer to the device/microsoc_sim folder)
You can then run a simulation of that software via :
cd $VEXIIRISCV
sbt "runMain vexiiriscv.soc.micro.MicroSocSim --load-elf $VEXII_FIRMWARE/build/app/uart/example-uart.elf --regfile-async --allow-bypass-from=0"
It should the produce :
...
[info] [Progress] Start MicroSocSim test simulation with seed 42
[info] WAITING FOR TCP JTAG CONNECTION
[info] Hello Vexii!
[info] *
[info] *
...
You can also add the --trace-fst --trace-konata arguments if you want to capture some traces, but be carefull to not let it run too long, as it will generate big file traces.
The "WAITING FOR TCP JTAG CONNECTION" is just a notification that you can connect from openocd (see the Simulation chapter above)
Adding a custom peripheral
Let's say you want to design a peripheral and then add it to the SoC, the MicroSoc contains one example of that via PeripheralDemo.scala. Take a look at it, its code is extensively commented :
This peripheral example is a very simple one which provide the CPU access to leds, buttons and an interrupt function of the buttons value.
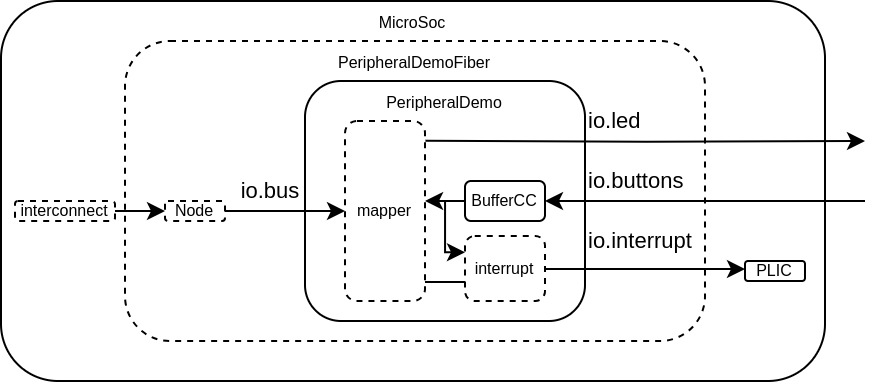
You can see in the diagram above :
PeripheralDemo : Which is our custom peripheral in its traditional sense (a hardware Component / Module). It use regular SpinalHDL stuff.
mapper : This is a tool which ease the creation of peripherals register file. Instead of having stuff like big switch case on the bus address, you just need to say "Create a RW register at this address" in a more natural language.
BufferCC : Used to avoid metastability when we use the buttons value in our hardware (this is a chain of 2 flip-flop)
PeripheralDemoFiber : This is sort of the integration layer for our PeripheralDemo into a SoC. This serve a few purposes. It handle the Tilelink parameters negotiation / propagation, as well as exporting the leds and buttons directly to the MicroSoc io.
Node : This is an instance of the tilelink bus in our SoC. It is used for parameter negotiation/propagation as well as to get the hardware bus instance.
You can then add that peripheral in the toplevel around the other peripherals by :
val demo = new PeripheralDemoFiber(new PeripheralDemoParam(12,16))
demo.node at 0x10003000 of bus32
plic.mapUpInterrupt(3, demo.interrupt)
This peripheral is already integrated into MicroSoC as a demo but disabled by default. To enable it, will need to provide a specific command line parameter. For instance :
sbt "runMain vexiiriscv.soc.micro.MicroSocSim --demo-peripheral leds=16,buttons=12"
Exporting an APB3 bus to the toplevel
Let's say you want to allow the CPU to access a APB3 peripheral which stand outside the SoC toplevel. Here is how you can do so by adding code to the MicroSoc.system.peripheral area :
class MicroSoc(p : MicroSocParam) extends Component {
  ..
  val system = new ClockingArea(socCtrl.system.cd) {
    ..
    val peripheral = new Area {
      ..
      // Let's define a namespace to contains all our logic
      val exported = new Area {
        // Let's define tl as our Tilelink peripheral endpoint (before the APB3 bridge)
        val tl  = tilelink.fabric.Node.slave()
        tl at 0x10006000 of bus32 // Lets map our tilelink bus in the memory space

        // Let's define our APB3 bus which will be exposed to the IO of the SoC
        val bus = master(Apb3(addressWidth = 12, dataWidth = 32))

        // Let's define a Fiber thread which will
        // - Handle the tilelink parameter negotiation
        // - Instantiate the APB3 bridge and connect the buses
        val fiber = Fiber build new Area{
          // Here we go with the tilelink negotiation
          tl.m2s.supported.load(
            M2sSupport(
              addressWidth = bus.config.addressWidth,
              dataWidth = bus.config.dataWidth,
              transfers = M2sTransfers(
                get = tilelink.SizeRange(4),
                putFull = tilelink.SizeRange(4)
              )
            )
          )
          tl.s2m.none()

          // Create the hardware bridge from tilelink to APB3 and connect the buses
          val bridge = new tilelink.Apb3Bridge(tl.bus.p.node)
          bridge.io.up << tl.bus
          bridge.io.down >> bus
        }
      }
    }
  }
}
If you want the CPU to be able to execute code located in the APB3 peripheral, then you will need to tag the tl bus with :
val tl  = tilelink.fabric.Node.slave()
tl at 0x10006000 of bus32 // Lets map our tilelink bus in the memory space
tl.addTag(spinal.lib.system.tag.PMA.EXECUTABLE)
Adding a custom instruction
Let's say you want to add a custom instruction to the MicroSoc. Let's use the Plugin implementation which does SIMD add.
In the MicroSoc, you can find :
val cpu = new TilelinkVexiiRiscvFiber(p.vexii.plugins())
We need to edit this into :
// Instantiate all the plugins from the command line arguments
val pluginsArea = p.vexii.pluginsArea()
// Add our custom plugin, pluginsArea.early0 refer to the default execute lane of the CPU
pluginsArea.plugins += new vexiiriscv.execute.SimdAddPlugin(pluginsArea.early0)
// Build the CPU
val cpu = new TilelinkVexiiRiscvFiber(pluginsArea.plugins)