Introduction
spinal.lib.misc.pipeline provides a pipelining API. The main advantages over manual pipelining are :
You don’t have to predefine all the signal elements needed for the entire staged system upfront. You can create and consume stageable signals in a more ad hoc fashion as your design requires - without needing to refactor all the intervening stages to know about the signal
Signals of the pipeline can utilize the powerful parametrization capabilities of SpinalHDL and be subject to optimization/removal if a specific design build does not require a particular parametrized feature, without any need to modify the staging system design or project code base in a significant way.
Manual retiming is much easier, as you don’t have to handle the registers / arbitration manually
Manage the arbitration by itself
The API is composed of 4 main things :
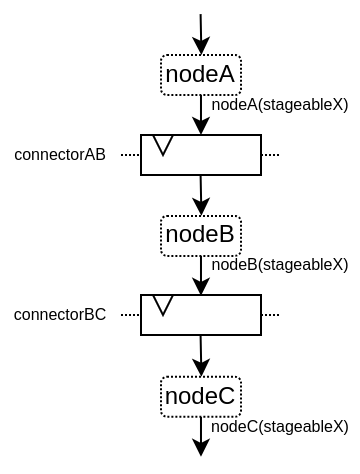
Node: which represents a layer in the pipelineLink: which allows to connect nodes to each otherBuilder: which will generate the hardware required for a whole pipelinePayload: which are used to retrieve hardware signals on nodes along the pipeline
It is important to understand that Payload isn’t a hardware data/signal instance,
but a key to retrieve a data/signal on nodes along the pipeline, and that the pipeline builder
will then automatically interconnect/pipeline every occurrence of a given Payload between nodes.
Here is an example to illustrate :
Here is a video about this API :
Simple example
Here is a simple example which only uses the basics of the API :
import spinal.core._
import spinal.core.sim._
import spinal.lib._
import spinal.lib.misc.pipeline._

class TopLevel extends Component {
  val io = new Bundle {
    val up = slave Stream (UInt(16 bits))
    val down = master Stream (UInt(16 bits))
  }

  // Let's define 3 Nodes for our pipeline
  val n0, n1, n2 = Node()

  // Let's connect those nodes by using simples registers
  val s01 = StageLink(n0, n1)
  val s12 = StageLink(n1, n2)

  // Let's define a few Payload things that can go through the pipeline
  val VALUE = Payload(UInt(16 bits))
  val RESULT = Payload(UInt(16 bits))

  // Let's bind io.up to n0
  io.up.ready := n0.ready
  n0.valid := io.up.valid
  n0(VALUE) := io.up.payload

  // Let's do some processing on n1
  n1(RESULT) := n1(VALUE) + 0x1200

  // Let's bind n2 to io.down
  n2.ready := io.down.ready
  io.down.valid := n2.valid
  io.down.payload := n2(RESULT)

  // Let's ask the builder to generate all the required hardware
  Builder(s01, s12)
}
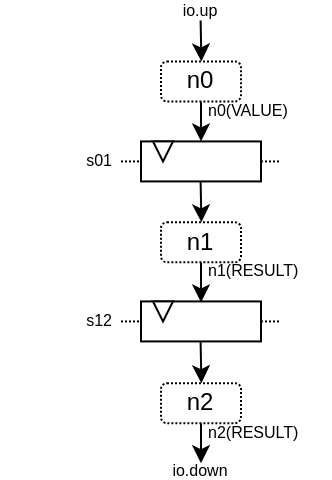
This will produce the following hardware :
Here is a simulation wave :
Here is the same example but using more of the API :
import spinal.core._
import spinal.core.sim._
import spinal.lib._
import spinal.lib.misc.pipeline._

class TopLevel extends Component {
  val VALUE = Payload(UInt(16 bits))

  val io = new Bundle {
    val up = slave Stream(VALUE)  // VALUE can also be used as a HardType
    val down = master Stream(VALUE)
  }

  // NodesBuilder will be used to register all the nodes created, connect them via stages and
  // generate the hardware.
  val builder = new NodesBuilder()

  // Let's define a Node which connect from io.up .
  val n0 = new builder.Node {
    arbitrateFrom(io.up)
    VALUE := io.up.payload
  }

  // Let's define a Node which do some processing.
  val n1 = new builder.Node {
    val RESULT = insert(VALUE + 0x1200)
  }

  //  Let's define a Node which connect to io.down.
  val n2 = new builder.Node {
    arbitrateTo(io.down)
    io.down.payload := n1.RESULT
  }

  // Let's connect those nodes by using registers stages and generate the related hardware.
  builder.genStagedPipeline()
}
Payload
Payload objects are used to refer to data which can go through the pipeline.
Technically speaking, Payload is a HardType which has a name and is used as a “key” to retrieve
the signals in a certain pipeline stage.
val PC = Payload(UInt(32 bits))
val PC_PLUS_4 = Payload(UInt(32 bits))

val n0, n1 = Node()
val s01 = StageLink(n0, n1)

n0(PC) := 0x42
n1(PC_PLUS_4) := n1(PC) + 4
Note that I got used to name the Payload instances using uppercase. This is to make it very explicit
that the thing isn’t a hardware signal, but are more like a “key/type” to access things.
Node
Node mostly hosts the valid/ready arbitration signals, and the hardware signals required for all
the Payload values going through it.
You can access its arbitration via :
API |
Access |
Description |
|---|---|---|
|
RW |
Is the signal which specifies if a transaction is present on the node. It is driven by the upstream. Once asserted, it must only be de-asserted the cycle after which either both |
|
RW |
Is the signal which specifies if the node’s transaction can proceed downstream. It is driven by the downstream to create backpressure. The signal has no meaning when there is no transaction ( |
|
RW |
Is the signal which specifies if the node’s transaction in being canceled from the pipeline. It is driven by the downstream. The signal has no meaning when there is no transaction ( |
|
RO |
|
|
RO |
|
|
RO |
|
|
RO |
|
|
RO |
|
|
RO |
True when the node transaction is being cleaned up. Meaning that it will not appear anywhere in the pipeline in future cycles. It is equivalent to |
Note that the node.valid/node.ready signals follows the same conventions than
the Stream’s ones .
The Node controls (valid/ready/cancel) and status (isValid, isReady,
isCancel, isFiring, …) signals are created on demand. So for instance you can create
pipelines with no backpressure by never referring to the ready signal. That’s why it is important
to use status signals when you want to read the status of something and only use control signals
when you want to drive something.
Here is a list of arbitration cases you can have on a node. valid/ready/cancel define
the state we are in, while isFiring/isMoving result of those :
valid |
ready |
cancel |
Description |
isFiring |
isMoving |
|---|---|---|---|---|---|
0 |
X |
X |
No transaction |
0 |
0 |
1 |
1 |
0 |
Going through |
1 |
1 |
1 |
0 |
0 |
Blocked |
0 |
0 |
1 |
X |
1 |
Canceled |
0 |
1 |
Note that if you want to model things like for instance a CPU stage which can block and flush stuff, take a look a the CtrlLink, as it provides the API to do such things.
You can access signals referenced by a Payload via:
API |
Description |
|---|---|
|
Return the corresponding hardware signal |
|
Same as above, but include a second argument which is used as a “secondary key”. This eases the construction of multi-lane hardware. For instance, when you have a multi issue CPU pipeline, you can use the lane Int id as secondary key |
|
Return a new Payload instance which is connected to the given Data hardware signal |
val n0, n1 = Node()

val PC = Payload(UInt(32 bits))
n0(PC) := 0x42
n0(PC, "true") := 0x42
n0(PC, 0x666) := 0xEE
val SOMETHING = n0.insert(myHardwareSignal) // This create a new Payload
when(n1(SOMETHING) === 0xFFAA){ ... }
While you can manually drive/read the arbitration/data of the first/last stage of your pipeline, there is a few utilities to connect its boundaries.
API |
Description |
|---|---|
|
Drive a node arbitration from a |
|
Drive a node arbitration from a |
|
Drive a |
|
Drive a |
|
Drive a node from a stream. The provided lambda function can be use to connect the data. |
|
Same as above but for |
|
Drive a stream from the node. The provided lambda function can be use to connect the data. |
|
Same as above but for |
val n0, n1, n2 = Node()

val IN = Payload(UInt(16 bits))
val OUT = Payload(UInt(16 bits))

n1(OUT) := n1(IN) + 0x42

// Define the input / output stream that will be later connected to the pipeline
val up = slave Stream(UInt(16 bits))
val down = master Stream(UInt(16 bits)) // Note master Stream(OUT) is good as well

n0.driveFrom(up)((self, payload) => self(IN) := payload)
n2.driveTo(down)((payload, self) => payload := self(OUT))
In order to reduce verbosity, there is a set of implicit conversions between Payload toward their data representation
which can be used when you are in the context of a Node :
val VALUE = Payload(UInt(16 bits))
val n1 = new Node {
    // VALUE is implicitly converted into its n1(VALUE) representation
    val PLUS_ONE = insert(VALUE + 1)
}
You can also use those implicit conversions by importing them :
val VALUE = Payload(UInt(16 bits))
val n1 = Node()

val n1Stuff = new Area {
    import n1._
    val PLUS_ONE = insert(VALUE) + 1 // Equivalent to n1.insert(n1(VALUE)) + 1
}
There is also an API which allows you to create new Area which provide the whole API of a given node instance
(including implicit conversion) without import :
val n1 = Node()
val VALUE = Payload(UInt(16 bits))

val n1Stuff = new n1.Area {
    val PLUS_ONE = insert(VALUE) + 1 // Equivalent to n1.insert(n1(VALUE)) + 1
}
Such feature is very useful when you have parametrizable pipeline locations for your hardware (see retiming example).
Links
There is few different Link already implemented (but you could also create your own custom one).
The idea of links is to connect two nodes together in various ways.
They generally have a up Node and a down Node.
DirectLink
Very simple, it connect two nodes with signals only. Here is an example :
val c01 = DirectLink(n0, n1)
StageLink
This connect two nodes using registers on the data/valid signals and some arbitration on the ready.
val c01 = StageLink(n0, n1)
S2mLink
This connect two nodes using registers on the ready signal, which can be useful to improve backpressure combinatorial timings.
val c01 = S2mLink(n0, n1)
CtrlLink
This is a kind of special Link, as it connects two nodes with optional flow control / bypass logic. Its API
should be flexible enough to implement a CPU stage with it.
Here is its flow control API (The Bool arguments enable the features) :
API |
Description |
|---|---|
|
Allows to block the current transaction (clear |
|
Allows to cancel the current transaction from the pipeline (clear |
|
Allows to request the upstream to forget its current transaction (but doesn’t clear the |
|
Allows to ignore the downstream ready (set |
|
Allows to duplicate the current transaction (clear |
|
Allows to hide the current transaction from downstream (clear |
Also note that if you want to do flow control in a conditional scope (ex in a when statement), you can
call the following functions :
haltIt(),duplicateIt(),terminateIt(),forgetOneNow(),ignoreReadyNow(),throwIt()
val c01 = CtrlLink(n0, n1)

c01.haltWhen(something) // Explicit halt request

when(somethingElse) {
    // Conditional scope sensitive halt request, same as c01.haltWhen(somethingElse)
    c01.haltIt()
}
You can retrieve which nodes are connected to the Link using node.up / node.down.
The CtrlLink also provide an API to access Payload :
API |
Description |
|---|---|
|
Same as |
|
Same as |
|
Same as |
|
Allows to conditionally override a |
val c01 = CtrlLink(n0, n1)

val PC = Payload(UInt(32 bits))
c01(PC) := 0x42
c01(PC, 0x666) := 0xEE

val DATA = Payload(UInt(32 bits))
// Let's say Data is inserted in the pipeline before c01
when(hazard) {
    c01.bypass(DATA) := fixedValue
}

// c01(DATA) and below will get the hazard patch
Note that if you create a CtrlLink without node arguments, it will create its own nodes internally.
val decode = CtrlLink()
val execute = CtrlLink()

val d2e = StageLink(decode.down, execute.up)
Other Links
There is also a JoinLink / ForkLink implemented.
Your custom Link
You can implement your custom links by implementing the Link base class.
trait Link extends Area {
  def ups : Seq[Node]
  def downs : Seq[Node]

  def propagateDown(): Unit
  def propagateUp(): Unit
  def build() : Unit
}
But that API may change a bit, as it is still fresh.
Builders
To generate the hardware of your pipeline, you need to give a list of all the links used in your pipeline.
// Let's define 3 Nodes for our pipeline
val n0, n1, n2 = Node()

// Let's connect those nodes by using simples registers
val s01 = StageLink(n0, n1)
val s12 = StageLink(n1, n2)

// Let's ask the builder to generate all the required hardware
Builder(s01, s12)
There is also a set of “all in one” builders that you can instantiate to help yourself.
StagePipeline
For instance there is the StagePipeline class which serve two purposes :
- It ease the creation of simple pipelines which are composed of : Node -> StageLink -> Node -> StageLink -> …
- It extends the pipeline length on the fly
Here is an example which :
Take the input at stage 0
Sum the input at stage 1
Square the sum at stage 2
Provide the result at stage 3
// Let's define a few inputs/outputs
val a,b = in UInt(8 bits)
val result = out(UInt(16 bits))

// Let's create the pipelining tool.
val pip = new StagePipeline

// Let's insert a and b into the pipeline at stage 0
val A = pip(0).insert(a)
val B = pip(0).insert(b)

// Lets insert the sum of A and B into the stage 1 of our pipeline
val SUM = pip(1).insert(pip(1)(A) + pip(1)(B))

// Clearly, i don't want to say pip(x)(y) on every pipelined thing.
// So instead we can create a pip.Area(x) which will provide a scope which work in stage "x"
val onSquare = new pip.Area(2){
  val VALUE = insert(SUM * SUM)
}

// Lets assign our output result from stage 3
result := pip(3)(onSquare.VALUE)

// Now that everything is specified, we can build the pipeline
pip.build()
StageCtrlPipeline
Very similar to StagePipeline, but it replace Nodes by CtrlLink, allowing to handle
the arbitration / bypasses on each stages, which is for instance quite useful for CPU designs.
Here is an example which :
Take the input at stage 0
Sum the input at stage 1
Check the sum value and eventually drop the transaction at stage 2
Provide the result at stage 3
// Let's define a few inputs/outputs.
val a,b = in UInt(8 bits)
val result = out(UInt(8 bits))

// Let's create the pipelining tool.
val pip = new StageCtrlPipeline

// Let's insert a and b into the pipeline at stage 0.
val A = pip.ctrl(0).insert(a)
val B = pip.ctrl(0).insert(b)

// Let's sum A and B at stage 1.
val onSum = new pip.Ctrl(1) {
  val VALUE = insert(A + B)
}

// Let's check if the sum is bad (> 128) in stage 2 and if that is the case,
// we drop the transaction.
val onTest = new pip.Ctrl(2) {
  val isBad = onSum.VALUE > 128
  throwWhen(isBad)
}

// Let's assign our output result from stage 3.
result := pip.ctrl(3)(onSum.VALUE)

// Now that everything is specified, we can build the pipeline.
pip.build()
Composability
One good thing about the API is that it easily allows to compose a pipeline with multiple parallel things. What it means by “compose” is that sometime the pipeline you need to design has parallel processing to do.
Imagine you need to do floating point multiplication on 4 pairs of numbers (to later sum them). If those 4 pairs are provided at the same time by a single stream of data, then you don’t want 4 different pipelines to multiply them, instead you want to process them all in parallel in the same pipeline.
The example below show a pattern which composes a pipeline with multiple lanes to process them in parallel.
// This area allows to take a input value and do +1 +1 +1 over 3 stages.
// I know that's useless, but let's pretend that instead it does a multiplication
// between two numbers over 3 stages (for FMax reasons).
class Plus3(INPUT: Payload[UInt], stage1: Node, stage2: Node, stage3: Node) extends Area {
  val ONE = stage1.insert(stage1(INPUT) + 1)
  val TWO = stage2.insert(stage2(ONE) + 1)
  val THREE = stage3.insert(stage3(TWO) + 1)
}

// Let's define a component which takes a stream as input,
// which carries 'lanesCount' values that we want to process in parallel
// and put the result on an output stream.
class TopLevel(lanesCount : Int) extends Component {
  val io = new Bundle {
    val up = slave Stream(Vec.fill(lanesCount)(UInt(16 bits)))
    val down = master Stream(Vec.fill(lanesCount)(UInt(16 bits)))
  }

  // Let's define 3 Nodes for our pipeline
  val n0, n1, n2 = Node()

  // Let's connect those nodes by using simples registers
  val s01 = StageLink(n0, n1)
  val s12 = StageLink(n1, n2)

  // Let's bind io.up to n0
  n0.arbitrateFrom(io.up)
  val LANES_INPUT = io.up.payload.map(n0.insert(_))

  // Let's use our "reusable" Plus3 area to generate each processing lane
  val lanes = for(i <- 0 until lanesCount) yield new Plus3(LANES_INPUT(i), n0, n1, n2)

  // Let's bind n2 to io.down
  n2.arbitrateTo(io.down)
  for(i <- 0 until lanesCount) io.down.payload(i) := n2(lanes(i).THREE)

  // Let's ask the builder to generate all the required hardware
  Builder(s01, s12)
}
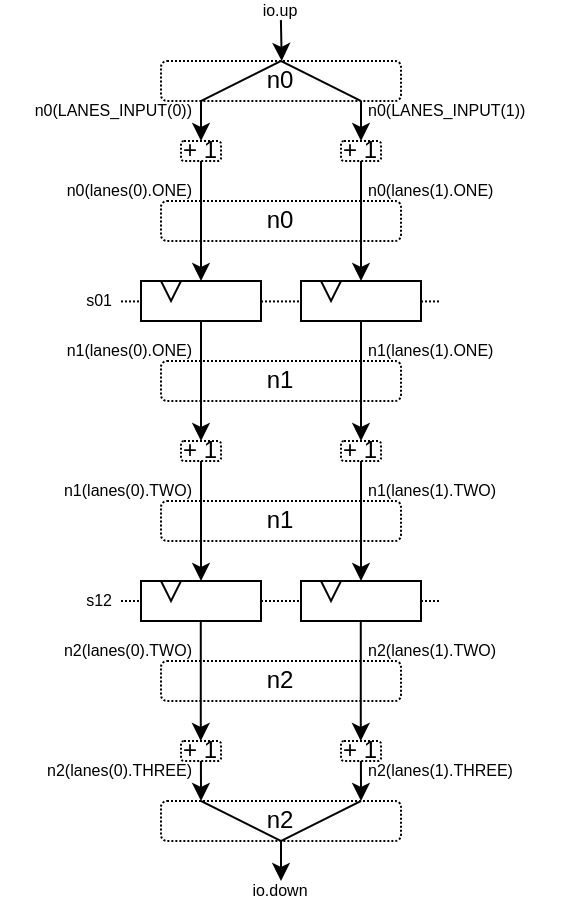
This will produce the following data path (assuming lanesCount = 2), arbitration not being shown :
Retiming / Variable length
Sometime you want to design a pipeline, but you don’t really know where the critical paths will be and what the right balance between stages is. And often you can’t rely on the synthesis tool doing a good job with automatic retiming.
So, you kind of need a easy way to move the logic of your pipeline around.
Here is how it can be done with this pipelining API :
// Define a component which will take a input stream of RGB value
// Process (~(R + G + B)) * 0xEE
// And provide that result into an output stream.
class RgbToSomething(addAt : Int,
                     invAt : Int,
                     mulAt : Int,
                     resultAt : Int) extends Component {

  val io = new Bundle {
    val up = slave Stream(spinal.lib.graphic.Rgb(8, 8, 8))
    val down = master Stream (UInt(16 bits))
  }

  // Let's define the Nodes for our pipeline.
  val nodes = Array.fill(resultAt+1)(Node())

  // Let's specify which node will be used for what part of the pipeline.
  val insertNode = nodes(0)
  val addNode = nodes(addAt)
  val invNode = nodes(invAt)
  val mulNode = nodes(mulAt)
  val resultNode = nodes(resultAt)

  // Define the hardware which will feed the io.up stream into the pipeline.
  val inserter = new insertNode.Area {
    arbitrateFrom(io.up)
    val RGB = insert(io.up.payload)
  }

  // Sum the r g b values of the color.
  val adder = new addNode.Area {
    val SUM = insert(inserter.RGB.r + inserter.RGB.g + inserter.RGB.b)
  }

  // Flip all the bit of the RGB sum.
  val inverter = new invNode.Area {
    val INV = insert(~adder.SUM)
  }

  // Multiply the inverted bits with 0xEE.
  val multiplier = new mulNode.Area {
    val MUL = insert(inverter.INV*0xEE)
  }

  // Connect the end of the pipeline to the io.down stream.
  val resulter = new resultNode.Area {
    arbitrateTo(io.down)
    io.down.payload := multiplier.MUL
  }

  // Let's connect those nodes sequentially by using simples registers.
  val links = for (i <- 0 to resultAt - 1) yield StageLink(nodes(i), nodes(i + 1))

  // Let's ask the builder to generate all the required hardware
  Builder(links)
}
If then you generate this component like this :
SpinalVerilog(
  new RgbToSomething(
    addAt    = 0,
    invAt    = 1,
    mulAt    = 2,
    resultAt = 3
  )
)
You will get 4 stages separated by 3 layers of flip-flops doing your processing :
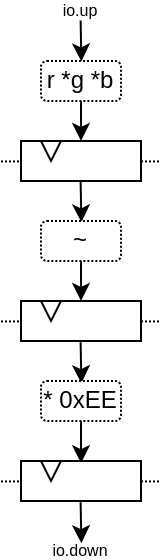
Note the generated hardware verilog is kinda clean (by my standards at least :P) :
// Generator : SpinalHDL dev    git head : 1259510dd72697a4f2c388ad22b269d4d2600df7
// Component : RgbToSomething
// Git hash  : 63da021a1cd082d22124888dd6c1e5017d4a37b2

`timescale 1ns/1ps

module RgbToSomething (
  input  wire          io_up_valid,
  output wire          io_up_ready,
  input  wire [7:0]    io_up_payload_r,
  input  wire [7:0]    io_up_payload_g,
  input  wire [7:0]    io_up_payload_b,
  output wire          io_down_valid,
  input  wire          io_down_ready,
  output wire [15:0]   io_down_payload,
  input  wire          clk,
  input  wire          reset
);

  wire       [7:0]    _zz_nodes_0_adder_SUM;
  reg        [15:0]   nodes_3_multiplier_MUL;
  wire       [15:0]   nodes_2_multiplier_MUL;
  reg        [7:0]    nodes_2_inverter_INV;
  wire       [7:0]    nodes_1_inverter_INV;
  reg        [7:0]    nodes_1_adder_SUM;
  wire       [7:0]    nodes_0_adder_SUM;
  wire       [7:0]    nodes_0_inserter_RGB_r;
  wire       [7:0]    nodes_0_inserter_RGB_g;
  wire       [7:0]    nodes_0_inserter_RGB_b;
  wire                nodes_0_valid;
  reg                 nodes_0_ready;
  reg                 nodes_1_valid;
  reg                 nodes_1_ready;
  reg                 nodes_2_valid;
  reg                 nodes_2_ready;
  reg                 nodes_3_valid;
  wire                nodes_3_ready;
  wire                when_StageLink_l56;
  wire                when_StageLink_l56_1;
  wire                when_StageLink_l56_2;

  assign _zz_nodes_0_adder_SUM = (nodes_0_inserter_RGB_r + nodes_0_inserter_RGB_g);
  assign nodes_0_valid = io_up_valid;
  assign io_up_ready = nodes_0_ready;
  assign nodes_0_inserter_RGB_r = io_up_payload_r;
  assign nodes_0_inserter_RGB_g = io_up_payload_g;
  assign nodes_0_inserter_RGB_b = io_up_payload_b;
  assign nodes_0_adder_SUM = (_zz_nodes_0_adder_SUM + nodes_0_inserter_RGB_b);
  assign nodes_1_inverter_INV = (~ nodes_1_adder_SUM);
  assign nodes_2_multiplier_MUL = (nodes_2_inverter_INV * 8'hee);
  assign io_down_valid = nodes_3_valid;
  assign nodes_3_ready = io_down_ready;
  assign io_down_payload = nodes_3_multiplier_MUL;
  always @(*) begin
    nodes_0_ready = nodes_1_ready;
    if(when_StageLink_l56) begin
      nodes_0_ready = 1'b1;
    end
  end

  assign when_StageLink_l56 = (! nodes_1_valid);
  always @(*) begin
    nodes_1_ready = nodes_2_ready;
    if(when_StageLink_l56_1) begin
      nodes_1_ready = 1'b1;
    end
  end

  assign when_StageLink_l56_1 = (! nodes_2_valid);
  always @(*) begin
    nodes_2_ready = nodes_3_ready;
    if(when_StageLink_l56_2) begin
      nodes_2_ready = 1'b1;
    end
  end

  assign when_StageLink_l56_2 = (! nodes_3_valid);
  always @(posedge clk or posedge reset) begin
    if(reset) begin
      nodes_1_valid <= 1'b0;
      nodes_2_valid <= 1'b0;
      nodes_3_valid <= 1'b0;
    end else begin
      if(nodes_0_ready) begin
        nodes_1_valid <= nodes_0_valid;
      end
      if(nodes_1_ready) begin
        nodes_2_valid <= nodes_1_valid;
      end
      if(nodes_2_ready) begin
        nodes_3_valid <= nodes_2_valid;
      end
    end
  end

  always @(posedge clk) begin
    if(nodes_0_ready) begin
      nodes_1_adder_SUM <= nodes_0_adder_SUM;
    end
    if(nodes_1_ready) begin
      nodes_2_inverter_INV <= nodes_1_inverter_INV;
    end
    if(nodes_2_ready) begin
      nodes_3_multiplier_MUL <= nodes_2_multiplier_MUL;
    end
  end


endmodule
Also, you can easily tweak how many stages and where you want the processing to be done, for instance you may want to move the inversion hardware to the same stage as the adder. This can be done the following way :
SpinalVerilog(
  new RgbToSomething(
    addAt    = 0,
    invAt    = 0,
    mulAt    = 1,
    resultAt = 2
  )
)
When you may want to remove the output register stage :
SpinalVerilog(
  new RgbToSomething(
    addAt    = 0,
    invAt    = 0,
    mulAt    = 1,
    resultAt = 1
  )
)
One thing about this example is the necessity intermediate val as addNode. I mean :
val addNode = nodes(addAt)
// sum the r g b values of the color
val adder = new addNode.Area {
  ...
}
Unfortunately, scala doesn’t allow to replace new addNode.Area with new nodes(addAt).Area. One workaround is to define a class as :
class NodeArea(at : Int) extends NodeMirror(nodes(at))
val adder = new NodeArea(addAt) {
    ...
}
Depending the scale of your pipeline, it can payoff.
Simple CPU example
Here is a simple/stupid 8 bits CPU example with :
3 stages (fetch, decode, execute)
embedded fetch memory
add / jump / led /delay instructions
class Cpu extends Component {
  val fetch, decode, execute = CtrlLink()
  val f2d = StageLink(fetch.down, decode.up)
  val d2e = StageLink(decode.down, execute.up)

  val PC = Payload(UInt(8 bits))
  val INSTRUCTION = Payload(Bits(16 bits))

  val led = out(Reg(Bits(8 bits))) init(0)

  val fetcher = new fetch.Area {
    val pcReg = Reg(PC) init (0)
    up(PC) := pcReg
    up.valid := True
    when(up.isFiring) {
      pcReg := PC + 1
    }

    val mem = Mem.fill(256)(INSTRUCTION).simPublic
    INSTRUCTION := mem.readAsync(PC)
  }

  val decoder = new decode.Area {
    val opcode = INSTRUCTION(7 downto 0)
    val IS_ADD   = insert(opcode === 0x1)
    val IS_JUMP  = insert(opcode === 0x2)
    val IS_LED   = insert(opcode === 0x3)
    val IS_DELAY = insert(opcode === 0x4)
  }


  val alu = new execute.Area {
    val regfile = Reg(UInt(8 bits)) init(0)

    val flush = False
    for (stage <- List(fetch, decode)) {
      stage.throwWhen(flush, usingReady = true)
    }

    val delayCounter = Reg(UInt(8 bits)) init (0)

    when(isValid) {
      when(decoder.IS_ADD) {
        regfile := regfile + U(INSTRUCTION(15 downto 8))
      }
      when(decoder.IS_JUMP) {
        flush := True
        fetcher.pcReg := U(INSTRUCTION(15 downto 8))
      }
      when(decoder.IS_LED) {
        led := B(regfile)
      }
      when(decoder.IS_DELAY) {
        delayCounter := delayCounter + 1
        when(delayCounter === U(INSTRUCTION(15 downto 8))) {
          delayCounter := 0
        } otherwise {
          execute.haltIt()
        }
      }
    }
  }

  Builder(fetch, decode, execute, f2d, d2e)
}
Here is a simple testbench which implement a loop which will make the led counting up.
SimConfig.withFstWave.compile(new Cpu).doSim(seed = 2){ dut =>
  def nop() = BigInt(0)
  def add(value: Int) = BigInt(1 | (value << 8))
  def jump(target: Int) = BigInt(2 | (target << 8))
  def led() = BigInt(3)
  def delay(cycles: Int) = BigInt(4 | (cycles << 8))
  val mem = dut.fetcher.mem
  mem.setBigInt(0, nop())
  mem.setBigInt(1, nop())
  mem.setBigInt(2, add(0x1))
  mem.setBigInt(3, led())
  mem.setBigInt(4, delay(16))
  mem.setBigInt(5, jump(0x2))

  dut.clockDomain.forkStimulus(10)
  dut.clockDomain.waitSampling(100)
}
Note
When building a pipeline, only node(0).valid or node(n).ready (where n
is the last stage in the pipeline) may be driven by user logic. It is possible for
the builder to optimize away node.ready or node.valid signals if they are
not used. To guarantee node.ready or node.valid signal creation (important
if you use CtrlLink() or any other link where you want flow control)
node(0).valid must be driven manually.
n0.valid := io.up.valid
// or
n0.valid := True/False

//Example with CtrlLink()
case class inputStage(stage: CtrlLink) extends Area {
   stage.up.valid := True
}
This is sufficient to ensure halting and CtrlLink behavior works as intended
(node.valid or node.ready signals are not optimized away).